Mastering the art of par-baking a pie crust ensures a flaky, golden base that stands up to even the juiciest fillings. This technique locks in a crisp, buttery texture while preventing sogginess, elevating your pie game effortlessly. With just over three hours of total time, including a hands-off chilling period, you’ll achieve professional-level results. The aroma of freshly baked crust wafting through your kitchen is simply irresistible.
Perfect for custard, cream, or fruit pies, this method guarantees a delicate crunch that complements every bite. The process is straightforward, and the payoff is a melt-in-your-mouth crust that’s worth every minute. Whether you’re a seasoned baker or a beginner, this par-baked crust will become your go-to for flawless pies every time.
Ingredients for Par-Baked Pie Crust
- Pie dough (such as homemade pie crust, recipe makes 2 crusts)
- Pie weights (you’ll need 2 packs, or substitute with dried beans)
- All-purpose flour (as needed for rolling out the dough)
Step-by-Step Instructions
- Prepare the pie dough: Make and chill your pie dough for at least 2 hours. If using the linked recipe, complete through step 5.
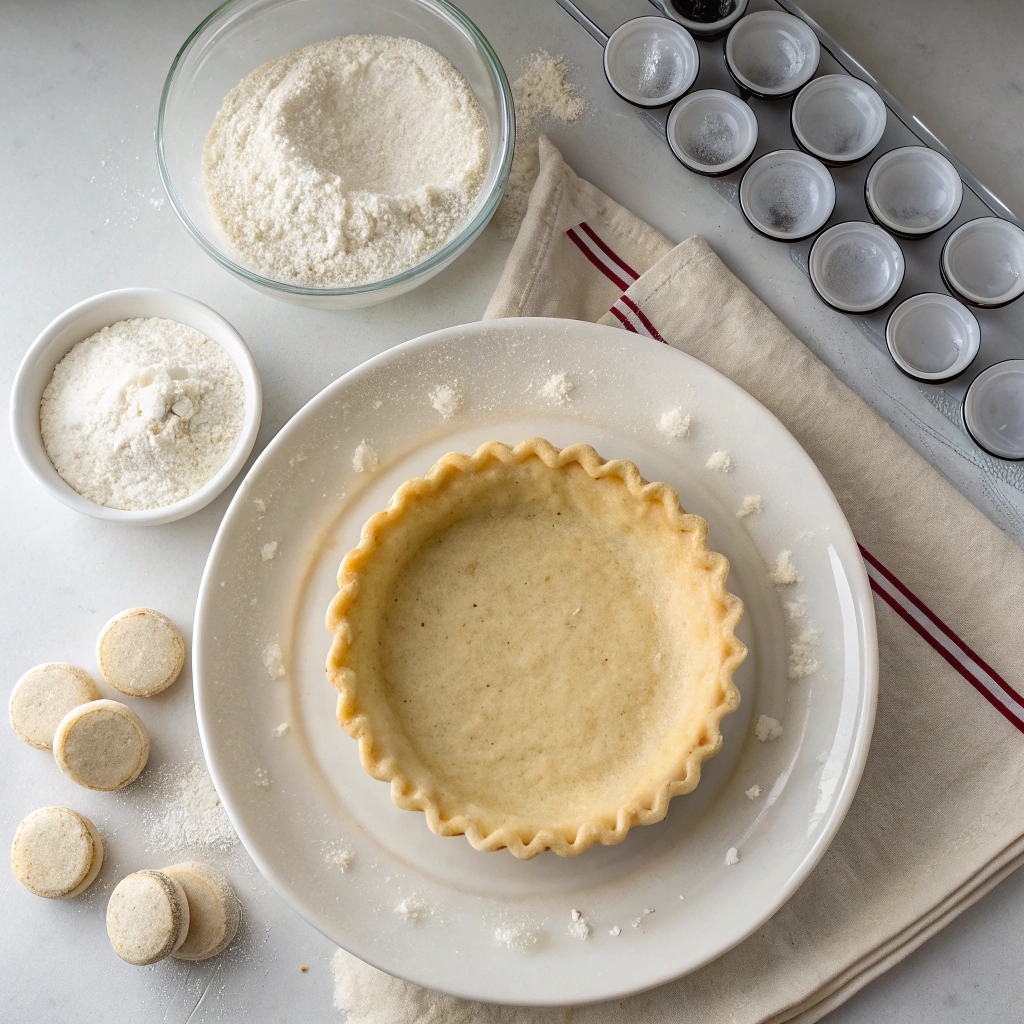
- Roll out the dough: On a floured surface, roll out one disc of chilled dough into a 12-inch circle. Place it into a 9-inch pie dish, tucking it in smoothly with your fingers.
- Optional dough strip technique: Roll out the second dough disc and cut 1- or 2-inch strips. Arrange them around the edges of the pie crust, melding them with your fingers to create a thicker edge. Crimp or flute the edges.
- Chill the crust: Refrigerate the shaped crust for at least 30 minutes (or up to 5 days). If freezing, wrap in plastic and thaw in the fridge before use.
- Preheat the oven: While the crust chills, preheat your oven to 375°F (190°C).
- Add pie weights: Line the chilled crust with crumpled parchment paper and fill with pie weights, pressing them against the sides to prevent shrinking.
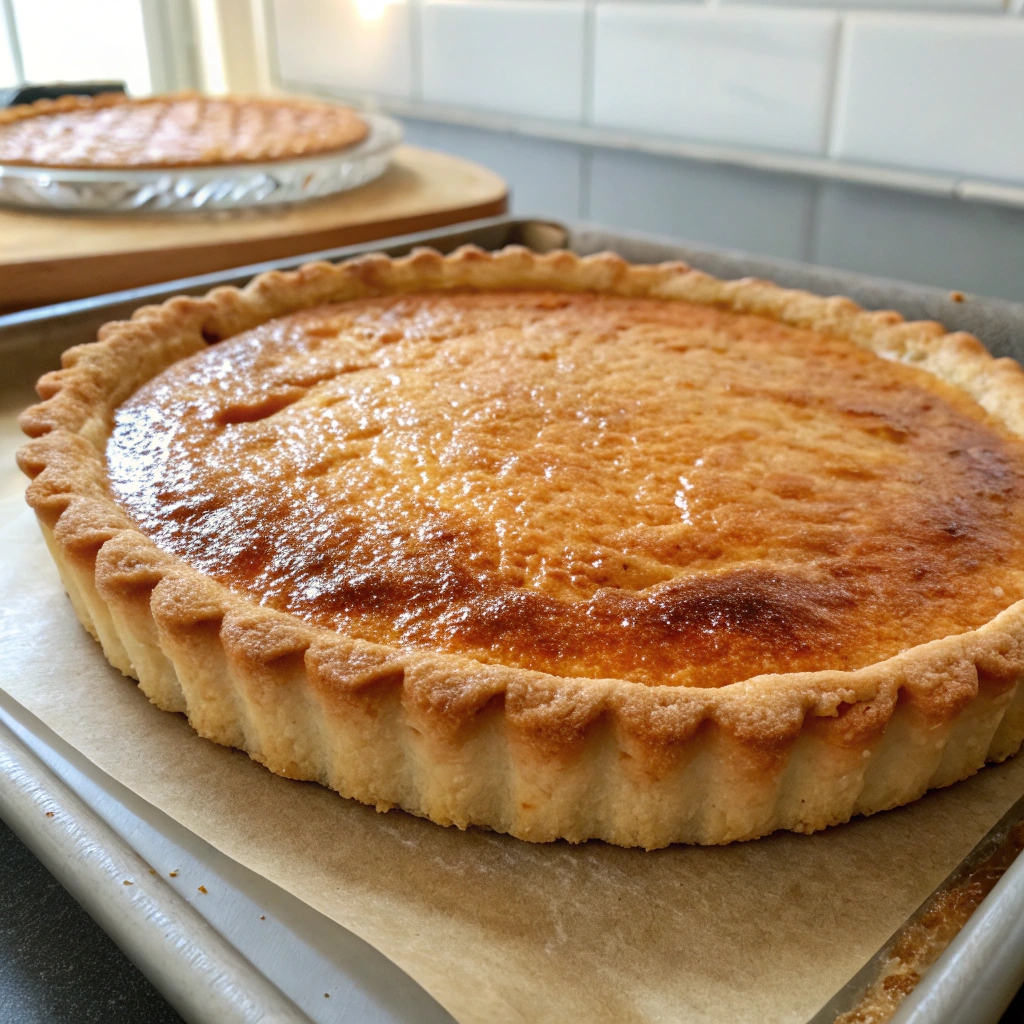
- Bake: Bake until the edges are set and lightly browned, about 15–16 minutes. Remove the weights and parchment, then prick the bottom crust with a fork.
- Finish baking: For a fully baked crust, bake until the bottom is golden brown, about 14–15 minutes longer. For a partially baked crust, bake until the bottom just begins to brown, about 7–8 minutes.
- Cool or fill: For no-bake pies, let the crust cool completely before adding filling. For pies that will bake again, you can add filling while the crust is still warm.
Time-Saving Tips for Perfect Pie Crust
If you’re short on time, consider preparing your pie dough ahead of time and storing it in the refrigerator for up to 5 days or in the freezer for up to 3 months. This way, you can skip the 2-hour chilling step when you’re ready to bake. Additionally, rolling out your dough between two sheets of parchment paper can save you from messy cleanup and make transferring the dough to the pie dish a breeze.
Storage and Reheating Instructions
Once your pie crust is par-baked, you can store it at room temperature for up to 2 days if wrapped tightly in plastic wrap. For longer storage, place it in the refrigerator for up to a week or freeze it for up to 3 months. When ready to use, simply reheat the crust in a 350°F (175°C) oven for 5-10 minutes to crisp it up again before adding your filling.
Common Questions Answered
Can I use something other than pie weights?
Absolutely! Dried beans, rice, or even sugar can work as a substitute for pie weights. Just ensure they’re evenly distributed to prevent the crust from puffing up.
Why do I need to prick holes in the crust?
Pricking holes allows steam to escape, preventing the crust from bubbling up and ensuring it bakes evenly. This step is crucial for a flat, even base.
Recipe Variations to Try
Experiment with different types of pie dough, such as a graham cracker crust for a sweet twist or a gluten-free crust for dietary needs. You can also add a sprinkle of sugar or cinnamon to the crust before baking for a subtle flavor enhancement. For savory pies, a dash of grated Parmesan cheese mixed into the dough can add a delightful touch.

How to Par-Bake Pie Crust Recipe
Ingredients
- pie dough such as homemade pie crust (recipe makes 2 crusts)
- pie weights (you need 2 packs)
- all-purpose flour, as needed for rolling out dough
Instructions
- Make the pie dough: Prepare and chill your pie dough for at least 2 hours. If using the linked recipe, prepare pie crust through step 5.
- Roll out the chilled pie dough: On a floured work surface, roll out one of the discs of chilled dough (keep the other one in the refrigerator until you need it). Turn the dough about a quarter turn after every few rolls until you have a circle 12 inches in diameter. Carefully place the dough into a 9-inch pie dish. Tuck it in with your fingers, making sure it is completely smooth.
- Dough strip technique: This step is optional, but will help prevent the sides from shrinking down as well as promise a thick and sturdy crust. Remove the 2nd pie dough disc from the refrigerator. Roll out the same way you rolled out the first one. Using a pizza cutter, slice rounded 1- or 2-inch strips, and arrange around the edges. Use your fingers to meld the dough together. What you’re basically doing here is adding another layer of crust to just the edges. Crimp or flute the pie crust edges. They should be nice and thick now. Wrap up any leftover pie dough to use for next time. Freeze it for up to 3 months.
- Refrigerate: Chill the shaped, unbaked pie crust in the refrigerator for at least 30 minutes and up to 5 days. Or freeze for up to 3 months. Cover the pie crust with plastic wrap if chilling for longer than 30 minutes or if you’re freezing it. If you freeze it, let it thaw for a couple hours in the refrigerator before continuing.
- While the crust is chilling, preheat oven to 375°F (190°C).
- Fill with weights: Line the chilled pie crust with parchment paper. (Crunch up the parchment paper first so that you can easily shape it into the crust.) Fill with pie weights or dried beans. I like to push the weights up against the sides of the pie crust to help ensure the sides don’t shrink down.
- Bake: Bake until the edges of the crust are starting to brown and appear set, about 15–16 minutes. Remove pie from the oven and carefully lift the parchment paper (with the weights) out of the pie. With a fork, prick holes all over the bottom crust. Return the pie crust to the oven.
- If you need a fully baked pie crust, bake until the bottom crust is golden brown, about 14–15 minutes longer. For a partially baked pie crust (if you’re baking the pie once it is filled, like a quiche), bake until the bottom crust is just beginning to brown, about 7–8 minutes.
- If you’re making a no-bake pie, let the baked crust cool completely before adding the filling unless your pie recipe states otherwise. For pies that will go back in the oven, like quiche or pumpkin pie, the crust can still be warm when you add the filling. (Again, unless your recipe states otherwise.)